For a quick overview video of the process start to finish CLICK ME.

For the detailed story starting at the beginning CLICK ME.

You can click on any photo in the blog to make it bigger.
Showing posts with label Parts update. Show all posts

Thursday, May 30, 2013

No Fury like a women scorned!

I don’t know what’s going on but ever since Saturday I seem to be on the wrong side of Jenna. She is in a full blown snit bucking and fighting everything I do. Bolts either break off, cross thread or I can’t find them. Welded nuts that should pop off with a touch of the air hammer have bionic strength. Parts that should bolt right in like the special Flyin Miata V8 sway bar and power steering adaptor kit don’t fit. Even just dumb stuff like banging my knee on the partially open door I have walked by 100 times without hitting.  And that really hurt!

With all the buckyness I’ve probably gotten 3 hours worth of work done in the last 8 hours of effort. What’s worse is based on my research I thought I could use the Miata fans and the Camaro fuel pump but neither of them will fit. $$$!
 
I joked with Charlie before I started that we might have to rename her Senna after the legendary F1 driver. Perhaps she is taking on his equally legendary cantankerous personality!

Then there is the wheel saga that is completely my fault but still making this week difficult. The first set of wheels I bought were back ordered till July. Then I found a cheap set of used flairs so I was able to fit 0 offset wheels and went that route.  Cool right?
Well after I posted that a guy told me the biggest mistake he ever made was cutting his fenders to flair them. There is no turning back from that and no reason to flair them and push out an 8” wheel. Flairs with a 10" wheel is cool but anything less falls into ricer territory. Humph…


But a bigger issue is I discovered wheels with less than +20 offset move the suspension scrub radius out too far and adversely impact the handling of the car. On a Miata +36 is optimum, +25 OK but 0 is horrible which is why all of the expensive forged racing wheels are +36. Humph #2...

So my beautiful 0 offset wheels are listed on ebay and the hunt begins again for wheels. 
But hey maybe with a new set of wheels and shoes Jenna will play nice again!

Not to be out done my wife made a rather odd comment this week.  She said "You can't die while the garage and basement is in such a mess".  OooooKaaaay dear...  I said as casually as I could "no problem just leave it all for Charlie and he'll put it to good use".  But you know how you ponder such things and replay them in you mind?  Is that a wifely premonition?  Good grief what would the poor dear do with this mess if I suddenly fell off the planet!  Wait, is she in cahoots with Jenna to do me in and end all this nonsense?  This is just such a weird week! 

I'm really only posting this for me to look back in a few years and remember what these days of struggle were like. I know these times of difficulty will make the reward that much sweeter and while I have my doubts about making my start up date I have no doubt Jenna is going to be amazing when she does run.

For everyone who has been born of God overcomes the world. 1 John 4.  Yeah that is a bit out of context but still a great word!

Tuesday, May 7, 2013

Wiring page 2 - The tangled web I've weaved!

Well I am sort of done wiring.  I still have about a dozen details to sort out like the backup lights and A/C functions but without the engine and dash in place I can’t go any farther.  
I tell you its really scary how many wires I think are not needed that I cut out of both harnesses. 
These should not be needed but I’d be shocked if everything works!

When I was in the dealer I used to say you live or die by the schematic and the meter and I found that to be very true with this experience too.
  And I love the GM schematics!
What is concerning going is forward is I no longer have a good schematic of the car to work with.  As soon as I ran a wire from the GM harness to the Miata harness both existing schematics became inaccurate.   
I envision a time half way through One Lap of America with something not working and having a nightmare of electrical issues to sort out.  Of course it would happen in the middle of nowhere at 2 AM!  Even now I have no idea if the work I have done is good and there is no way to test it before I try to start it.

So all I can do is move forward the best I can.  But before I do I would like to leave a note here for myself on the next build and others planning their build a couple of things I would do differently.  In order of importance:
1, limit music selections to Norah Jones with some easy Rory Block, Lisa Mann and Michael Buble for variety.  Simple, easy and relaxing tunes are paramount to the process.
2, have at least 3 wire cutters, 3 small LED flashlights and 3 utility knives.  One set for dash work, one in the engine bay and one set in my pocket.  That should reduce the hours spent searching for them by at least half.  :-) 
3, remove ALL unnecessary wires in the Miata before you even take the Camaro harness out of the box.  Working around a half installed Camaro harness to do it is really a PITA.
4, take more photos as you take things apart because you WILL forget how the dash harness was routed and where the fuse box bolted in.
5, remember thinking I know I am not going to use this so I don’t need to mark it?  You were wrong!  At the moment I have 3 wires that are tagged “unknown probably not needed”.  No wonder I sleep so lousy!

In other news I had an interesting turn of events in the parts department this week.  The wheels I ordered are back ordered for 6 weeks.
I love those wheels but am hoping to need them before I would be able to get them. 

Meanwhile I found a set of used fender flairs on a forum for 125 bucks.  They are just bolt on arch flairs not a full fender flair so they will look like this

This is a big deal because I got them for 1/3rd the price of new and because it opens up 0 offset wheel options.  It will mean more body work but I can live with that for the pay off.  So with that I picked up these wheels in a 0 offset


The spokes are more bronze then this on the real wheels and with the 0 offset they should fill up the wheel wells about like the above car. That JPS car is steadily growing on me to be my favorite and I might just have to reevaluate the wing idea…
5/30/13 Wheel update HERE I did not use the flairs or the wheels due to scrub radius issues.

Speaking of body work this week I connected with a fellow V8 Miata guy that passed along a great idea for the hood.  After a couple hours hunting around for photos of various L88 Corvette hoods I decided his idea is the way to go and ordered this mini version of a Corvette L88 hood scoop. 
It will be a lower, smaller and much less radical version of this concept.
Is that cool or what?  Thank you Shannon for a much better idea on the scoop that I was planning!!

7/6/13 Scoop update HERE I did not go with the L88 scoop but used a Camaro SS scoop instead.  It turned out to be not such a good idea because I still needed a vent but that is a whole other post HERE.
 
Now of course when I started all this I had no intention of doing this much body work to the car.  The rust is a big enough problem to deal with without hanging flairs and scoops on it too. 
But what’s another 10 hours of body work in a 2000 hour project right? LOL!
 
God willing next post Jenna should be sporting her LS1! Yahoo!!
 
PS if you did not click on that One Lap of America above you should check it out. I have followed this event for years and it is very high on my bucket list. My dream is to do it with my son Charlie and Jenna would be a great ride for the adventure.  Anyway the race is running this week so and it's fun to keep up with the events.
 
Proverbs 27:17 Just as iron sharpens iron and one man sharpens another.  Have a GREAT week!


Monday, April 22, 2013

The thrilling days of watching paint dry!

This was a very sloooow week in the build and rather unorganized. With the seam welding done the next step is to clean and seal the seams. Unfortunately the temps in Minnesota are still running 25 degrees below normal so the polyurethane sealer I used took FOREVER to set up. Once it did I hit it with primer and waited for it to dry followed by 2 coats of black paint and waited AND WAITED for it to dry!
So basically for the week I could not touch anything inside the car or engine bay.
Note to you kids trying this at home.  If your car is black use matt or semi gloss paint because gloss dosn't match old dirty paint at all! 

Now I could have worked on the rear end, rebuilt the steering gear, put the new bearings in, put the new CV joints on the axles, or 30 other things while stuff dried.  But none of them seemed like the right thing to do next and I was foiled again with option overload. As the panicky realization set in that there is so much to do I’ll never finish I did the only thing I could do, I read the instructions!  

It’s been quite a while since I opened them and come to find out I was supposed to fit the radiator while I had the engine in the car. Opps. So my options are to wait till the engine is back or make some educated assumptions and go for it. Since fabrication is a million times more fun then rebuilding a steering gear I did the latter…

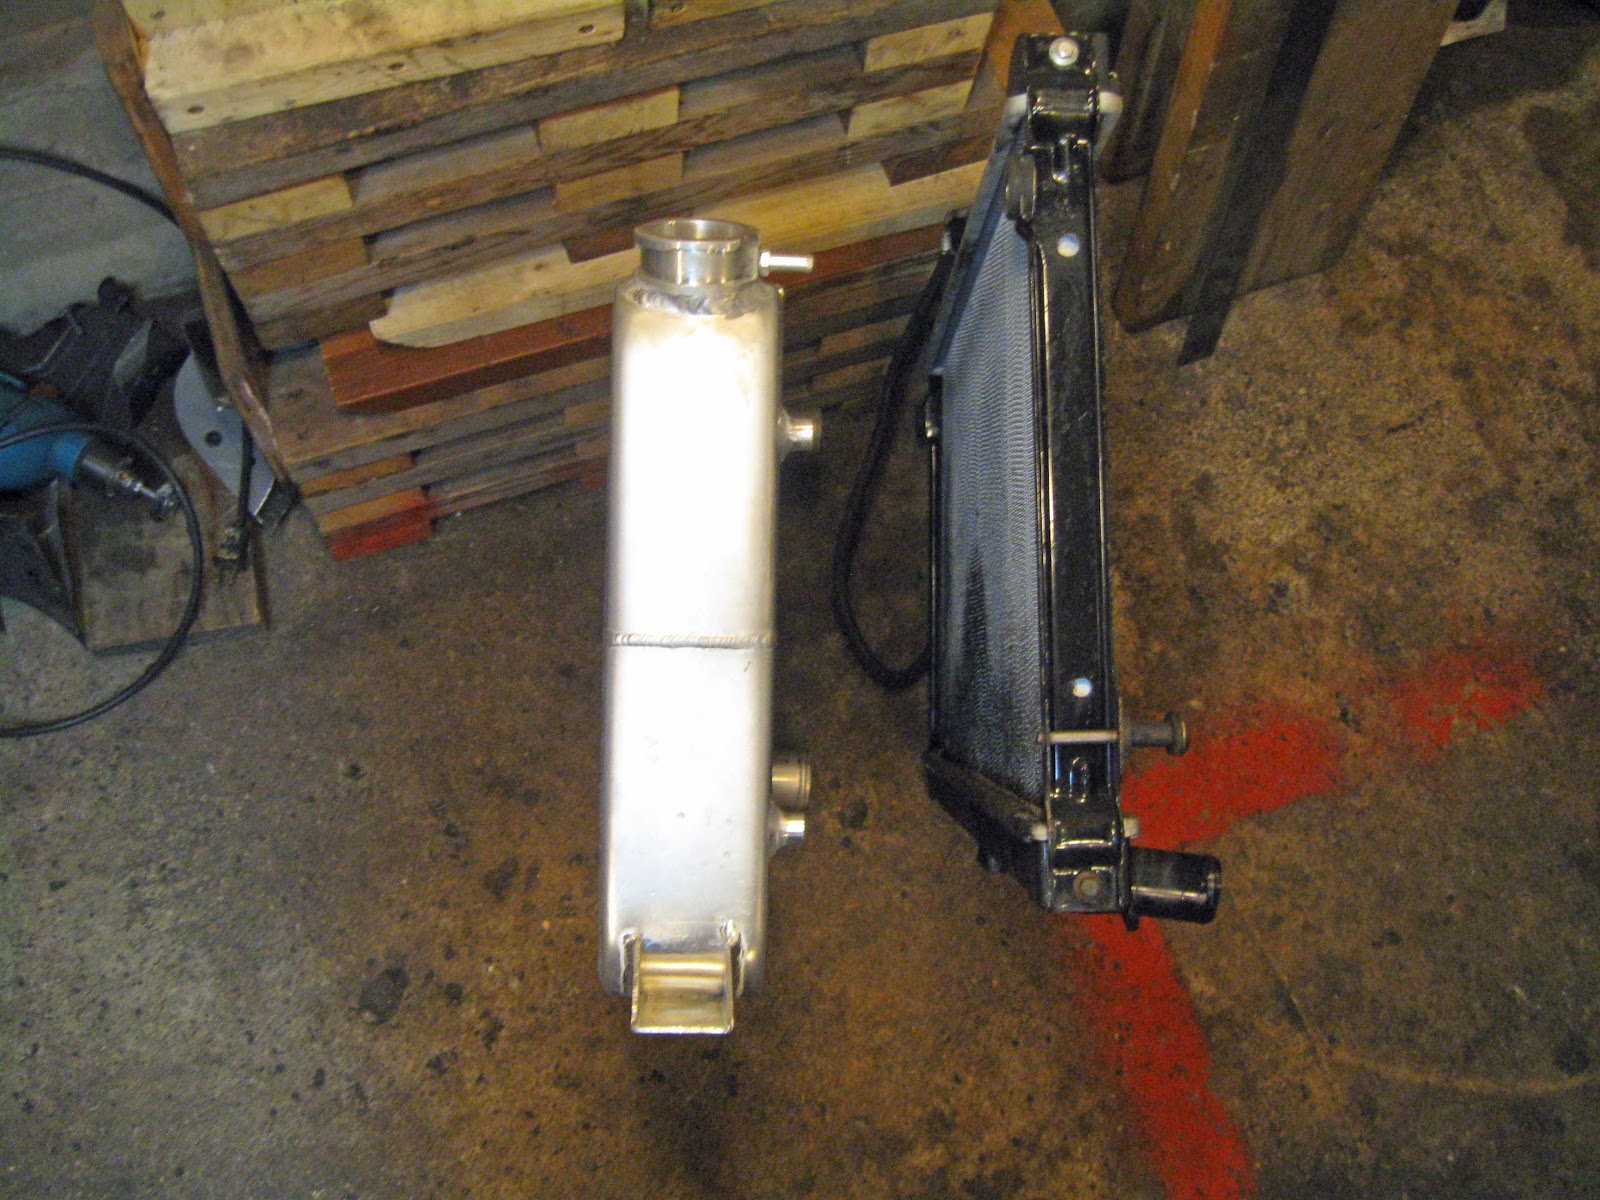
First up was looking at the factory radiator and how it was mounted. The short answer is its tiny and way too far rear ward so out came the sawsall and off went the factory mounts. This is the new radiator compared to the factory one.
The factory one is sitting at an odd angle in the shot they really are about the same height. The new one is 3 times thicker though!

I should mention here that the radiator I am using is not a proper V8 swap radiator. The Flyin Miata radiator made for this is a custom built Griffin that bolts in but costs 650 bucks. That ranks right up there with the $850 oil pan for causing builder heart attacks and budget explosions!
I picked up a Griffin Scirocco race radiator that is a bit smaller than I would like but was only $239 and is rated for 600 HP. I’m pretty sure 600 HP is enough and I can drill and tap a fitting into it and make mounting brackets for less than 400 bucks!
 

I came up with a simple but effective little foot to bolt the radiator to.
Then fabbed up little brackets to mount it to the core support. I even welding nuts underneath so it bolts right in!
I don’t have any photos but I modified the hood latch and fit the AC condenser too. I did not make mounts for the condenser yet because I need to figure out which side of things the fans are going to go on first. I really can’t do that till I have the engine and sway bar in place.

While I had the welder out I whipped up a couple of little braces to go on the fire wall to add support for the strut tower brace I made last week.  More fabrication I love it!
But more painting to do!  Blah!!

The last bit of excitement for the week involves an ad that was posted on the car club forum for some Miata wheels wanted.  I was planning on swapping wheels next year and either having a set of track wheels and using what I have now for the street or selling them and getting smaller / wider ones to run all the time. 
Well hit reply to the add and last night a nice young Marine shows up with 650 bucks and carts off my wheels and tires.  So my timetable moved up a year and I won't be running 2 sets of tires!

Another change in the plans that reveals Gods plan for this project is not quite the same as mine.  Jeremiah 29:11 says I know the plans I have for you declares the Lord, plans to prosper you and not harm you, plans to give you hope and a future.  It will be interesting to see what He comes up with for wheels now!!

Saturday, April 13, 2013

Arm chair Engineer playing with a welder ;-)

One of my favorite parenting insights is if you give a 2 year old a hammer of course the whole world needs hammering.  Turns out it's the same with arm chair engineers like me and welders too.  I keep coming across seams that seem to cry out to be welded and it's like everything in sight needs welding!

So it goes that I keep coming up with welding projects on the car.  I hadn't really planned on doing this now but for the last couple days I have been making braces to firm up the chassis.

If you think about how an engine bay is made it's kind of like a shoe box.  The frame rails, firewall and core support make up the sides and the engine cradle is the bottom of the box.  Well just like a shoe box the engine bay is much sturdier with a lid on it.  So parts companies have come up with lots of braces to put the lid on the box.  One of the more popular designs of engine bay braces looks like this gold one:

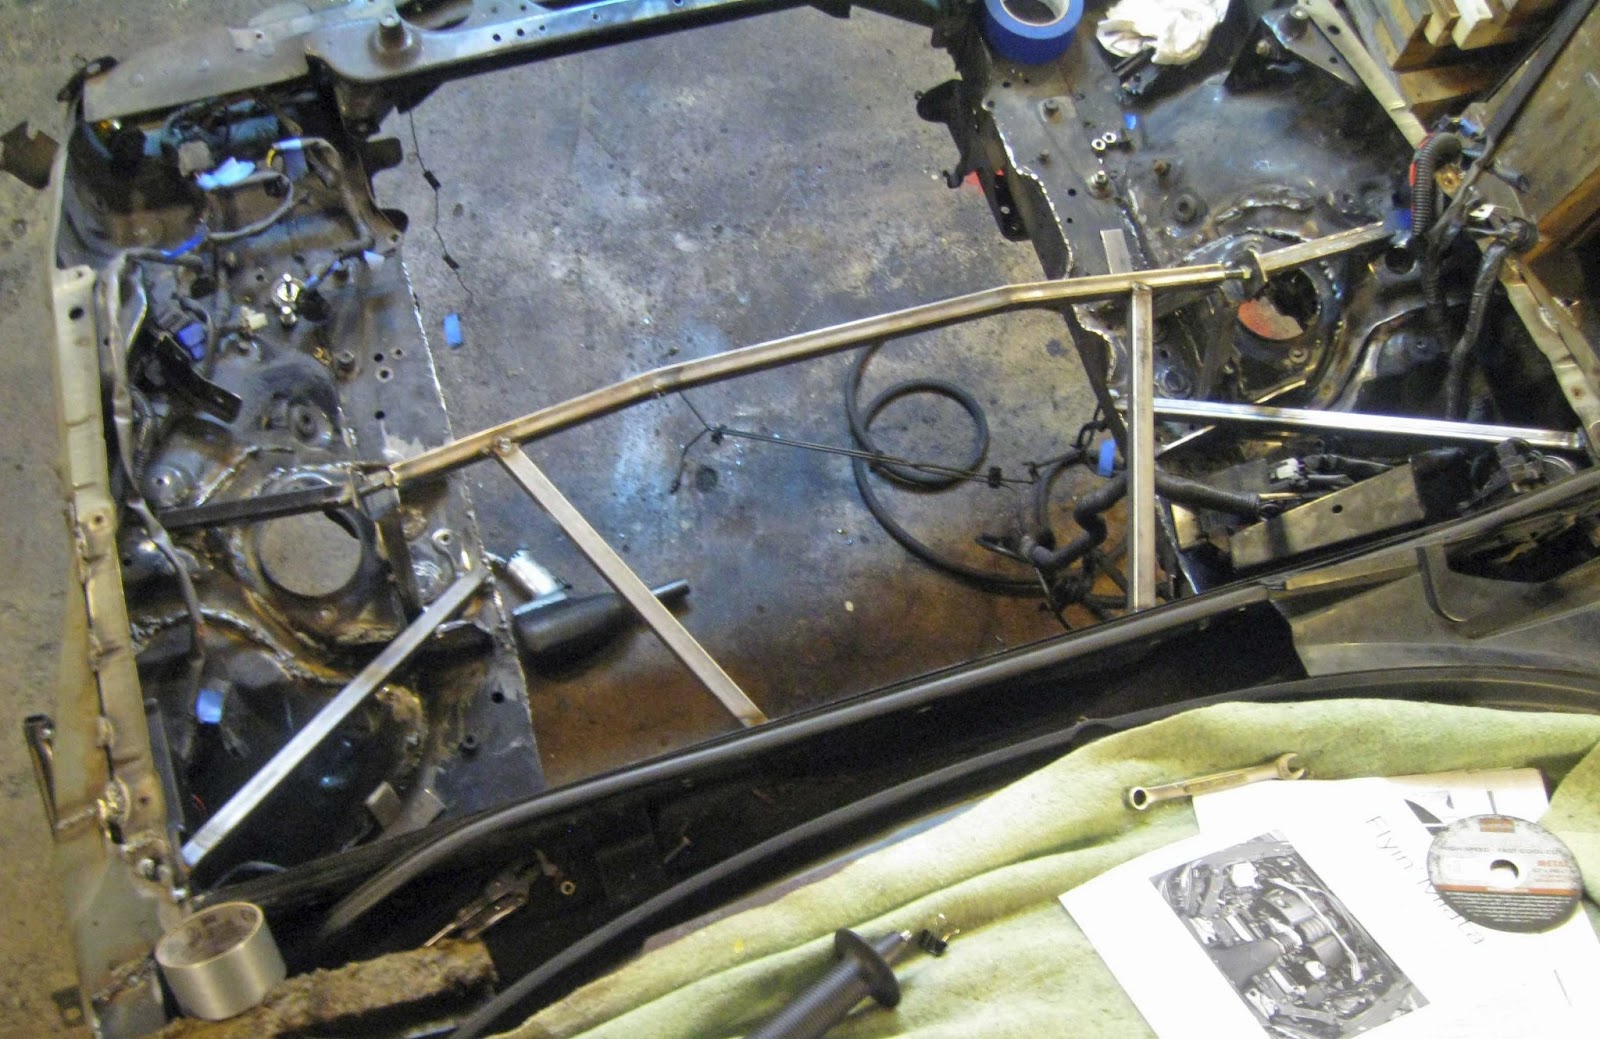
It nicely ties the fire wall to the shock towers to put a lid on the box.  The only problem with it is it costs $250.  But with $15 in tubing and a welder that can be resolved. :-)  So this is what I came up with.

I know it is kind of hard to see but if you click on the photo you can see it bigger.

Notice the braces going from the frame to the back corners.  I added those for a couple reasons but mostly because all convertibles suffer from cowl shake and these braces will eliminate it.

Tying the frame rails to the corner will hopefully also add structural support for cornering loads on the upper control arms.
 
Here you can really see how open the engine bay structure is with out the added braces.  It really is a wide open box!
 Yes I did pull the engine back out again.  I need to weld up the firewall where I made the cuts to widen it.  Next time it goes in for good thought!!!

The other contraption that makes a big difference in Miatas is the green critter in this photo called a frog arm.

It is a pretty cool hunk of bling that stiffens up the front of the car but again the price tag on them is $250 so I just welded up some pretty simple bars.

I may expand on that some but I'm really tired from not sleeping well this week so I quit with that.  We had a huge ice storm and the power was out for a couple of days.  It's amazing how you take electricity for granted until it's gone!!  The whole town looks like a war zone.

God has blessed us again with no damage to the house or property other than some limbs down.
Psalm 91:1-3  Those who live in the shelter of the Most High will find rest in the shadow of the Almighty.  This I declare about the Lord: He alone is my refuge, my place of safety  he is my God, and I trust in him.  Fore will rescue you from every trap and protect you from every evil.

Friday, April 5, 2013

Clipping along at 100 feet of welding wire per hour.

Here are some more welding shots for ya.  This is the front driver’s side strut tower fairly well cleaned up.
 Notice the sparse factory welds at the arrows.
These are the times I wish clicking on the photo did not make them bigger for you!!   Well anyway this is after welding....
Yes my welds still stink but it is really hard to get all the seam sealer out so the welds bubble like crazy. I think I had my wire feed a bit too high too. Well that is the excuse I am going with anyway!

This is the underside of the same shock tower all welded (or is that buggered?) up. 

This is the same fender area seen from above. I did not weld that upper brace solid because of the large gap between the pieces and there were no welds in there at all from the factory. Crumple zone maybe?
Oh and yes that blanket caught fire several times...J

I still have the entire passenger side to do and some under the car yet but should finish up on Saturday Lord willing.
It is not hard work but certianally it is A LOT of work.   I would say I have about 7 hours in it so far and easily another 3 to go before I am done.  So far I have used 2000 feet of welding wire and will easily top 3000 feet before I am done.  The good news is wire is cheap and it's only about 3 1/2lbs of weight!

In other news the Motive gears came Thursday and I got them in.  They set up much better but I am still not happy at all with the pattern.  The problem is the opposite of the Ford gears and even with no shim in the pinion I am still too deep in the gear. 

 
The drive side is a little low but what's worse is how the pattern cuts off sharply down deep in the tooth.  The pinion too deep but I can't take any more shims out or reduce the back lash any more.  If this was a GM 7.5 like I am used to working with I think this would be noisy but on the larger Ford 8.8 I'm not so sure.  I know the bigger gears are more forgiving but you know I've had a bad experience with this.  Actually several bad experiences!

Well, I'll be poindering this situation as I weld over the weekend but no worries, "I rejoice in the Lord always. I will say it again: Rejoice!"  (Philippians 4:4)

Tuesday, April 2, 2013

Hey does this rear end make me look fat?

The one place on the build I did not spare any expense is the rear end. Why? Because twice last summer I exploded the Camaro rear end and had to drag the car home from the track.

Now when say exploded I really mean exploded. The gears inside and housing looked worse than the cover.

So I choose the biggest baddest rear end that would fit in the Miata then replaced every serviceable part in it with genuine Ford Racing parts. I didn’t plan on doing that when I started so I blew the rear end budget by twice the budgeted amount. But the more I thought about last summer the more I did not want to repeat that with the Miata!

The rear end is an 8.8 locker out of a 96 Thunderbird. Dale and I had some fun tearing it down and pressing the new bearings on carrier in his shop. Back on my bench I rebuilt the locker with new carbon fiber clutch discs.
Next up a new set of 3.55 gears. The Tbird gears were 3.27 but that is too low for 6th gear and good launches at the starting line. Hopefully they are not so radical that they don't just turn tires into smoke!

I put the new pinion in but did not press on the new pinion bearing yet. Instead I ground down the old one so it would slip it on and off the pinion easily. That way I can swap shims with no press during the set up process.
And a good thing I did because my first pattern the pinion is WAY too shallow so I need a thicker shim.
This is where the story takes a turn for the worse. With how far off the above photo is I knew the shim would have to be quite a bit thicker but all the shims from the install kit only added up to .011 and no way would that be enough. Well with no other options I put them all in and much to my surprise the pinion hit the carrier and would not rotate. I tried fewer shims and a number of combinations but there was no way to get the pinion deep enough without hitting the carrier.

Now I knew there were going to be scratch your head how am I ever going solve this problem situations in the build but using all top end Ford parts in a diff overhaul is not where I expected it!

So it was off to Google to see where I went wrong and sure enough I found it. The ring and pinion sets from aftermarket gear makers like Motive and Richmond fit all 8.8 rear ends from Mustangs to Thunderbirds to trucks. But for whatever incredibly stupid reason the Ford racing ring and pinion only fits Mustangs. I’m not sure if it’s because I missed quite a bit of sleep trying to figure this out or because I’m stuck with a set of Mustang gears I can’t return but am a little bit crabby about this situation. It's bone head engineering like this that let the foreign car makers shut detroit down!

Well forever forward. I ordered a set of Motive 3.55s and the Fords will go on ebay.

Psalm 121:1-2

I lift up my eyes to the mountains— where does my help come from?
My help comes from the Lord, the Maker of heaven and earth.