For a quick overview video of the process start to finish CLICK ME.

For the detailed story starting at the beginning CLICK ME.

You can click on any photo in the blog to make it bigger.

Friday, June 28, 2013

No start up goal - FAIL and V8 Miata Driveshaft for cheap.

I know I said no more start up goals and I really tried hard not to think about it... but even as I said no goals I had 4th of July in the back of my mind... :-)  What's the old adage you have to have a target or you miss every time??

I finished up the A/C last night and everything else under the hood is ready to go. The diff is on my bench for final set up and the drive shaft is done. Speaking of that check out the work of art the drive shaft shop made for me. 
This is the old Camaro shaft next to the new Miata one.

 And the incredible welds

Don’t know why the conversion companies charge 400+ bucks for a custom shaft.  I got new U joints, a new tube with welding and balance for $150.

Anywhoo I should have all the parts to build the axles Monday and the computer back from the tuner Tuesday.  There is still no suspension, body panels or interior on the car but those minor details. 

So I am officially setting a very ambitious goal of driving the car to church on July 7th.  Yes in 2013 which leaves me 7 days to get er done. Hum now that I look at that it in writing it looks very - impossible!  Well no target no shot so here we go.

OK with so few photos in this post I have to leave you with my favorite V8 Miata video just to make your day better. 
 
 
Why you ask? LOL- because he can!  Wish me luck and have a GREAT week!


Tuesday, June 25, 2013

Wiring - does it ever end?

Doing the preliminary wiring on the car before I put the engine in was the right thing to do.  However getting side tracked for 2 months before finishing it was for sure a mistake!  I ended up spending a couple of nights chasing wires trying to figure out what was not done and second guessing myself on if things were done right.

The good news in that is I found a mistake.  Or two… ah..., OK or three already! Turns out when you are tired and 25% color blind Black / Blue wires are easy to confuse with Blue / Black wires.  Hey you try it which is which here?

 
I also discovered a little A/C issue that tripped me up for a couple of hours.  The pressure sensor in the Camaro had 3 wires from the computer and apparently uses some logic to watch the system.  The Miata pressure sensor is a simple 2 wire switch that turns the compressor off if the pressure is too low.

Nope the Camaro sensor won't just thread on the Miata pipe or this would be easy! 

While I let that problem percolate in my mind I dug into the anti-theft system from the Camaro to figure out how to wire up the body computer to make just that circuit work right.  In the old days it was easy to defeat the anti-theft by just wiring in the right resistor, but now the system uses a data pulse that is much more difficult to replicate.  The body computer will do it but it also did a ton of other stuff in the Camaro that the Miata dosn't need.   

 After several days of consideration I decided the answer to both problems is another 75 bucks over budget to have the computer reprogramed. They will take out the anti-theft and computer control of the A/C. There is no reason for the computer to bump the idle when the compressor comes on when you have 400 ft lbs of torque anyway!  They will also remove the evap and gas tank pressure stuff and set the speedo to the right gear ratio.
 
The down side to this is I had to rewire the A/C system to a stand alone system by adding a relay and rewireing the fans.  No biggie but still the hours of wiring work keep piling up!!


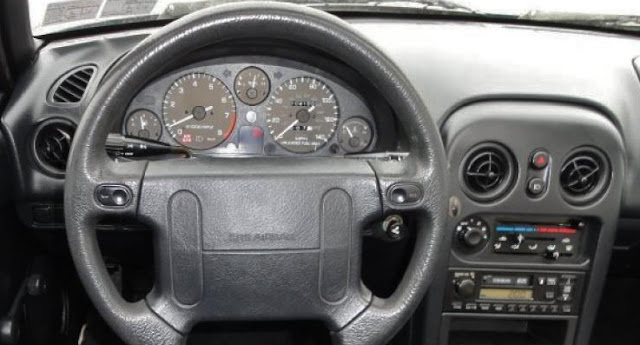
With the computer on the way to Missouri I dug into another little project I have been planning for months. Miatas have terrible factory gauges. Both the oil pressure and temp gauges are actually idiot lights that look like a gauge. The other problem is there is no place on the dash to put good gauges in. 
A lot of people take out the center 2 A/C vents and put them there but I really want A/C to work right.  The center of the dash is too far from eyesight for critical gauges anyway.

So in my usual mode of thinking rather than sleeping I came up with this idea using $8 ebay gauge pods and a couple hunks of 3/4" x 1" aluminum angle. 

This is the dash around the instrument panel with little pieces of angle cut into it.
 
The 3/4" leg is out and the 1" leg is stacked behind the plastic. I didn't know it at the time but stacking them so the longer one is in the upper postion was a mistake. You'll see why below. 
A bit of my favorite urethane to hold the aluminum angle in place.

And the pods.
Like so!
Sweet right?
See how the lower one is right up against the A/C panel?  If I had stacked the aluminum pieces the other way or just made the lower prong longer I would have had room to move it forward from the A/C panel. 20/20 hindsight! 
 
At the other end of the gauges I have the temp sensor in that you saw before
and here is where the oil pressure line leads too.  
I tried to find somewhere under the car on the frame to put the remote oil filter but this was the only decent place I could find for it.
The other sensor in the housing is for the factory gauge and I will probably put a strobe light or buzzer on it too.  
 
It felt like I spent a ton of time going in circles on wiring this week but I did get enough done to call it a good week. Now that the oil and cooling systems are sealed up with just a little work on the power steering I could dump oil and water in it and turn the key... Mwahaha!! :-)
Shout for joy to the Lord all the earth and worship Him with gladness!

Sunday, June 16, 2013

Radiator hoses – you can’t get there from here.

I read in several build threads whimsical tails of making a pattern for radiator hoses then easily matching them up at the auto parts store. So I made my patterns and headed to town.
 
This is the top pattern.
After a little trimming on the water pump neck so they don't have to stick out so far I did pretty well finding a top hose

But the lower outlets point in 2 different directions on 2 different planes and you just can’t get there from here with rubber hose.  It's really hard to see in the photo how weird the angles are or how tight it is to the A/C compressor.
And the pattern

There was no way to make the half of a figure 8 needed but I did find a hose that would get me in the ball park.
So now what?  Looking at this picture the obvious easy way out would be to take the radiator to a shop and have them point that outlet straight up. But anyone with a credit card can do that and I'm not beat yet!

So with a completely bogus plan in mind I hit the 30 cents a pound scrap pile and found everything I needed for under a buck.  And with my usual design on the fly method I started tacking things together

What- you don't have a lower radiator hose manifold on your car?
Perfect fit. Nailed it!
Weld, check, leak, repeat...
The observant eye will notice the weld on top is different in this shot from the one in the vise. 
 
Yes that is rust from a lot of leaking water and rewelding.... 
But it painted up fine.
Yes it is ridicules and took me a good 6 hours to make by time I fixed all the leaks.  But even with mileage to the steel yard and wending wire figured in I have less than 5 bucks of materials in it.  Which brings the total $$ I have into the entire cooling system to 500 bucks less than Flyin miatas cooling set up thank you very much!

OK truth to be told if I did it again I would take the radiator to a shop even if it costs 50 bucks to turn that inlet up.  It would have been worth it in time, weight and confidence of it not leaking.  But now I know for the next build!

Neither death or life or angels or demons, neither the present age or the future or any powers, neither height or depth or anything else in all creation can separate us from the love of God that is in Christ Jesus our Lord.  (Rom 8) And you thought this car had power!

Friday, June 14, 2013

Happy Birthday Jim!!

I wanted to mark this day with an update because it was my original turn key go vroom goal day when I started the project back in January.  So this is where I am at now and what my guess is to finish it:

Cooling system       3 hours, finish the radiator hoses and fab mounts & wire the fans
Oiling system          3 hours, install lines, gauge fittings and mount the remote filter
Intake system         3 hours, buy parts, fab hangers and install
Wiring                   4 hours, figure out the vats system and wire in the dash
Power steering       3 hours, install lines and mount the cooler
Exhaust                 3 hours, fab and install hangers, pipes and muffler
A/C                       3 hours, finish lines, mount condenser better and charge
Suspension            6 hours, it's all in the shed with lots of new parts to go in
Rear end               4 hours, finale gear set up, install new axle bearings & CV joints  
Trans                    2 hours, set up the shifter and bleed the clutch
Interior                  5 hours, seats, dash, paint and install the roll bar & door bars
Assemble body      5 hours, hang fenders, hood and lights.

I know what you are thinking but you can't just do down the list. You see the fans have to go on before the condenser, and the condenser before the steering cooler, but wait the sway bar has to go in before the fans, and the lower radiator hose before the sway bar, but will the intake hose I don't have yet fit between the sway bar and the fan? and shouldn't you get the alternator and belt in there pretty soon.... Now you see why I constantly wonder what to do next and why nothing is actually finished!!
 
Well 45ish hours would put me into July but we'll see how it goes.

OK it's time for happy birthday to me!  Number 53 if you are interested. To celebrate here is the 3rd attempt at wheels. They are not the best looking wheel on the planet but they are the right size and offset so this is it.  Now reminiscing time is over and it's off to the tire shop and back to work!

Happy Fathers day guys!  Enjoy them while you can because empty nest totally stinks!
I love you DAD!!  Thanks believing in me and showing me your great DIY approch to life!!

Friday, June 7, 2013

I GIVE UP!

So I’m reading Shannons blog and he mentioned needing to move the fire wall gusset so the evaporator would fit before he welded up his tunnel.  Um... time for another
along with the wow I really messed up sinking feeling!  When I welded it back together I never thought to check that…  Time to adjust the plan!

I had planned on installing the A/C after I had it on the road but it makes a lot more sense to do it now while it is all apart.  

So I went to put the compressor on only to find it hits the sway bar and wouldn’t go on. Opps… I wish I would have checked that before I welded the brackets back on!  So I rebuilt the sway bar brackets again moving it another 3/8” forward.  (total about 5/8s forward from stock now and you can see the stock hole just behind where it is mounted in this shot)
With the compressor and sway bar in place I laid out the hoses to figure out if I could merge the 2 systems.  Yes I am avoiding putting the evaporator in because I don’t want to know how much trouble I am in!
 
It appears the logical way to merge the 2 systems is using all the Miata stuff on the car side and the Camaro lines off the compressor.  So I ordered up a couple of nifty connectors to splice the hoses.  This guy
 for the high side and simple barbed fittingfor the low side.
I'll make some brackets and get the condensor in this weekend and face the music on the firewall too...

Now the reason this post is titled "I give up" is I need stop focusing on my start up goal and just build the car right.  I still have the final set up to do on the rear end and no suspension under it so it’s kind of pointless to have it run next weekend anyway. 

I'm fine with missing the goal.  I have come so far and accomplished so much it's impossible to feel dissipointed! 

* updating this post - IT FITS!!There is no carpet or insulation under a bit of it and it is tight on the gusset but the evaporator went right in there.  Happy day!!  


Monday, June 3, 2013

The other half of the back half

It seems like a year ago I rebuilt the rear end because soo much has happened since then.  But it’s really only been parked under my bench for about 2 months.  It's mostly ready go except for the little detail that there is no way to mount it in the car. ;-)  Now I could have left it there and focused on getting the engine running to make my start up goal but I'd rather have the drive shaft in properly so I can have oil in the transmission when I do try and start it even if I miss the date.
 
So out comes the rear frame.
More rust but thankfully it came out with no trouble.
Martins Monster Miata 8.8 parts are symmetrical but Jenna is not so it took some grinding to dial in the back mount.
A shot with the back mount on and the diff sitting on it.  So far so good!The front mount had about a 3/8” gap to the frame that it should not have had IMO.So I added some end plates with a couple of tabs and gussets on the back to weld to.
And of course while I had the welder out how could I resist adding some support to the frame with braces too?
Now I would like to pause here and post a quote from a fine welder in another buildthread: "Clearly the anti-corrosion dip or electroplate that Mazda does to these cars inhibits the welding process. I cleaned the metal very well, but it was still difficult to get a nice bead without burning through"

VALADATED!!! I was hoping I wasn't such a klutz that I couldn't weld on this car! Thankfully the frame was normal metal so I got some spanking good welds on these mounts where I really needed them. So good I'll zoom for you this time!! 
Still not going to be in any text book but I'm really happy with them!  So I have it welded up and ready for paint.  It sure dosn't seem like there is much holding that big differential in the car... 
So far all the work has been done off the car on the subframe and Jenna seemed to be cooperating.  But there was no time like now with the wheel wells wide open to roll the fenders so I had to risk her fury and give it a try.
Interesting just as I getting ready to start the Top Gear guys were talking about the perception that Miatas are girls cars that no real men would own.  I have a hunch that had something to do with the fenders rolling like a dream!  I’ve done a lot of fender rolling in my time but never one that went so smooth, fast and easy as this one.  Turns out it pays to have Netflix in the garage!  No problem fitting manly size tires on her now...

It cracked the paint as I expected it would do but no problem with a little black Rustoleum.
Also with the subframe out it was easy to drop the gas tank down a little and run the fuel lines through.
Oh yeah I would have needed to do the fuel lines to start it too right?  LOL!
All in all not a bad weekend but I didn’t work on it round the clock this weekend.  As much as I want to get it going with this beautiful summer top down weather I needed to back off and remember this is a marathon not a sprint! 
11 days and counting till my start up goal, Yikesl!! 
Have a GREAT week everyone!