For a quick overview video of the process start to finish CLICK ME.

For the detailed story starting at the beginning CLICK ME.

You can click on any photo in the blog to make it bigger.

Monday, April 29, 2013

The answer to one of life’s most difficult questions

From where we sit is it easy to see luck as good or bad or even nonexistent so that stuff just happens at random.  So as "luck" goes when I made a mental picture of where the clutch master cylinder goes I had plenty of space to clear the corner brace I put in.
Thing is that mental picture was the stock Miata master cylinder not the much larger V8 one.

So was this my lucky day or did God guide my hand in measuring to allow just enough room for the bigger part?  Furthermore if I had put the brace 1/8th farther rearward would it have been my unlucky day or would it still be God guiding my hand to teach me to be more careful with details?

Well to draw from about 150 verses it is clear that God is in control of all of his creation and delighted to take what seem to be random acts of both good and evil people to accomplish his plan.  Even if only to show me how lucky I am that he IS in control of ALL things!

 Including the slip of the grinder that cut the wiring in the right of the photo!  LOL! 
So the answer is God is good all the time and all "luck" good or bad is his to give as a blessing or a challange. So you see this really is your lucky day!! 

Thursday, April 25, 2013

Flairs, body kit, camouflage paint?

The question was asked with all these mods under the skin what is going to happen on the outside?

Actually I have had many sleepless nights pondering that very question.  For some reason I keep going back to the first car that I transformed as much as the Miata.  It was a 1965 Mustang fastback that was red with white Shelby stripes.  I loved that car!

So my current thought is a tip of the hat to my old Mustang by going black with gold Shelby stripes, wheels that are not too modern and not too huge and subtle but functional vents and splitter. 

My favorite Miata that captures what I have in mind is this one:
 
Picture that black with gold stripes and nickel or gold wheels like so:

I will need to run some sort of hood vent and right now my top choice is a factory GT500 Mustang vent. Partly because it functions so well for drawing air through the radiator and partly because it is another Mustang part.

Now since this car is built for the track I’d love to have functional wing, flairs and proper splitter on it.

But there are 2 problems with that.  First there are WAY too many riced up junky 4 door Accords with them that are not even capable of going fast enough to need down force, (not that the owners or anyone else has a clue what they are for anyway) and second… OK actually there only one problem with it. :-) 

I am for sure open to ideas.  The only thing I know for sure is the base color will be black and it will have 2 stripes from bumper to bumper. What do you think?


POST UPDATE.  I did lay out stripes on the car here: Click to see the stripes

Monday, April 22, 2013

The thrilling days of watching paint dry!

This was a very sloooow week in the build and rather unorganized. With the seam welding done the next step is to clean and seal the seams. Unfortunately the temps in Minnesota are still running 25 degrees below normal so the polyurethane sealer I used took FOREVER to set up. Once it did I hit it with primer and waited for it to dry followed by 2 coats of black paint and waited AND WAITED for it to dry!
So basically for the week I could not touch anything inside the car or engine bay.
Note to you kids trying this at home.  If your car is black use matt or semi gloss paint because gloss dosn't match old dirty paint at all! 

Now I could have worked on the rear end, rebuilt the steering gear, put the new bearings in, put the new CV joints on the axles, or 30 other things while stuff dried.  But none of them seemed like the right thing to do next and I was foiled again with option overload. As the panicky realization set in that there is so much to do I’ll never finish I did the only thing I could do, I read the instructions!  

It’s been quite a while since I opened them and come to find out I was supposed to fit the radiator while I had the engine in the car. Opps. So my options are to wait till the engine is back or make some educated assumptions and go for it. Since fabrication is a million times more fun then rebuilding a steering gear I did the latter…

First up was looking at the factory radiator and how it was mounted. The short answer is its tiny and way too far rear ward so out came the sawsall and off went the factory mounts. This is the new radiator compared to the factory one.
The factory one is sitting at an odd angle in the shot they really are about the same height. The new one is 3 times thicker though!

I should mention here that the radiator I am using is not a proper V8 swap radiator. The Flyin Miata radiator made for this is a custom built Griffin that bolts in but costs 650 bucks. That ranks right up there with the $850 oil pan for causing builder heart attacks and budget explosions!
I picked up a Griffin Scirocco race radiator that is a bit smaller than I would like but was only $239 and is rated for 600 HP. I’m pretty sure 600 HP is enough and I can drill and tap a fitting into it and make mounting brackets for less than 400 bucks!
 

I came up with a simple but effective little foot to bolt the radiator to.
Then fabbed up little brackets to mount it to the core support. I even welding nuts underneath so it bolts right in!
I don’t have any photos but I modified the hood latch and fit the AC condenser too. I did not make mounts for the condenser yet because I need to figure out which side of things the fans are going to go on first. I really can’t do that till I have the engine and sway bar in place.

While I had the welder out I whipped up a couple of little braces to go on the fire wall to add support for the strut tower brace I made last week.  More fabrication I love it!
But more painting to do!  Blah!!

The last bit of excitement for the week involves an ad that was posted on the car club forum for some Miata wheels wanted.  I was planning on swapping wheels next year and either having a set of track wheels and using what I have now for the street or selling them and getting smaller / wider ones to run all the time. 
Well hit reply to the add and last night a nice young Marine shows up with 650 bucks and carts off my wheels and tires.  So my timetable moved up a year and I won't be running 2 sets of tires!

Another change in the plans that reveals Gods plan for this project is not quite the same as mine.  Jeremiah 29:11 says I know the plans I have for you declares the Lord, plans to prosper you and not harm you, plans to give you hope and a future.  It will be interesting to see what He comes up with for wheels now!!

Wednesday, April 17, 2013

News Flash: Seam welding done and suspension score!

Another great day in the build I am finally done seam welding!!   Never in my wildest dreams did I think seam welding the chassis would take so long or use so much wire and gas. 
OK, yes I admit I went overboard and welded some seams that were not specifically recommended by V8R or Flyin Miata.  The “while I’m here I may as well” mind set is a slippery slope to a lot of work!  I have over a mile of welding wire and at least 25 hours in to it. 
 Yes you read that right I managed to burn through 5373 feet of wire seam welding the car!
Surprisingly I can tell the difference already.  I can hear it in the way the doors close and as I struggled to fit the tunnel gussets back in place there is no question the tunnel is stiffer now.   For those of you trying this at home do weld the frame rails and seat rails along with the firewall gussets under the dash.  It is totally worth it!

Today was also a GREAT day in the parts department. I picked up a set of spec Miata springs and shocks with 96 hours on them for 600 bucks.  (Hours not miles because they are out of a race car)

For those that don’t know what this is were talkin Eibach 700 ft lb front springs with 325 rears and Bilstein racing shocks. This is the real deal Spec Miata racing suspension for less than half the price of new.

If my wife is reading this sorry sweets this will make the car ride like a lumber wagon on
date nights... but it will handle like a race car on race day! Yahoo!!

Psalm 66:1-4 says:
Shout joyfully to God, all the earth;
Sing the glory of His name;
Make His praise glorious.
Say to God, “How awesome are Your works!
Because of the greatness of Your power Your enemies will give feigned obedience to You.
“All the earth will worship You,
And will sing praises to You;
They will sing praises to Your name.”


Saturday, April 13, 2013

Arm chair Engineer playing with a welder ;-)

One of my favorite parenting insights is if you give a 2 year old a hammer of course the whole world needs hammering.  Turns out it's the same with arm chair engineers like me and welders too.  I keep coming across seams that seem to cry out to be welded and it's like everything in sight needs welding!

So it goes that I keep coming up with welding projects on the car.  I hadn't really planned on doing this now but for the last couple days I have been making braces to firm up the chassis.

If you think about how an engine bay is made it's kind of like a shoe box.  The frame rails, firewall and core support make up the sides and the engine cradle is the bottom of the box.  Well just like a shoe box the engine bay is much sturdier with a lid on it.  So parts companies have come up with lots of braces to put the lid on the box.  One of the more popular designs of engine bay braces looks like this gold one:

It nicely ties the fire wall to the shock towers to put a lid on the box.  The only problem with it is it costs $250.  But with $15 in tubing and a welder that can be resolved. :-)  So this is what I came up with.

I know it is kind of hard to see but if you click on the photo you can see it bigger.

Notice the braces going from the frame to the back corners.  I added those for a couple reasons but mostly because all convertibles suffer from cowl shake and these braces will eliminate it.

Tying the frame rails to the corner will hopefully also add structural support for cornering loads on the upper control arms.
 
Here you can really see how open the engine bay structure is with out the added braces.  It really is a wide open box!
 Yes I did pull the engine back out again.  I need to weld up the firewall where I made the cuts to widen it.  Next time it goes in for good thought!!!

The other contraption that makes a big difference in Miatas is the green critter in this photo called a frog arm.

It is a pretty cool hunk of bling that stiffens up the front of the car but again the price tag on them is $250 so I just welded up some pretty simple bars.

I may expand on that some but I'm really tired from not sleeping well this week so I quit with that.  We had a huge ice storm and the power was out for a couple of days.  It's amazing how you take electricity for granted until it's gone!!  The whole town looks like a war zone.

God has blessed us again with no damage to the house or property other than some limbs down.
Psalm 91:1-3  Those who live in the shelter of the Most High will find rest in the shadow of the Almighty.  This I declare about the Lord: He alone is my refuge, my place of safety  he is my God, and I trust in him.  Fore will rescue you from every trap and protect you from every evil.

Monday, April 8, 2013

Elijah visits my garage…

This was indeed a strange, but good weekend.  Friday night I was welding on the last shock tower when I ran out of wire.  I changed rolls - #4 for those who are counting – and when I turned the gas back on the needle on the tank did not move.  Bummer I was out of gas on a Friday night which means no welding till Monday night.  The regulator needle still showed 15psi still so I welded a couple inches and just as expected it started splattering and the weld turned black like all welds do with no gas. 

So with no gas it was on to the next step which is test fitting the engine to be sure the tunnel is right before welding.  I unwrapped the Camaro engine and got it ready.  
I put in a new rear main seal and checked the new oil pan and pick up tube for proper fit.  Since this is a baffled pan with doors it cannot be installed upside down.

This is the V8 Roadsters engine mount. 
It is very well made but I can see why a lot of guys make their own mounts.  It’s not very complicated and a stretch to justify $1200 for.  I am glad I bought it though because it saved much time and engineering and if nothing else I have a pattern for the next build now…J

Up she goes headers and all!

Fits like a glove!
It’s surprising how well the V8 fits in the engine bay.  Why didn’t Mazda think of this??

The new oil pan works great.  The mounts on the frame under the front of the pan are for the steering rack.  I didn't check it but it should fit fine.
I 
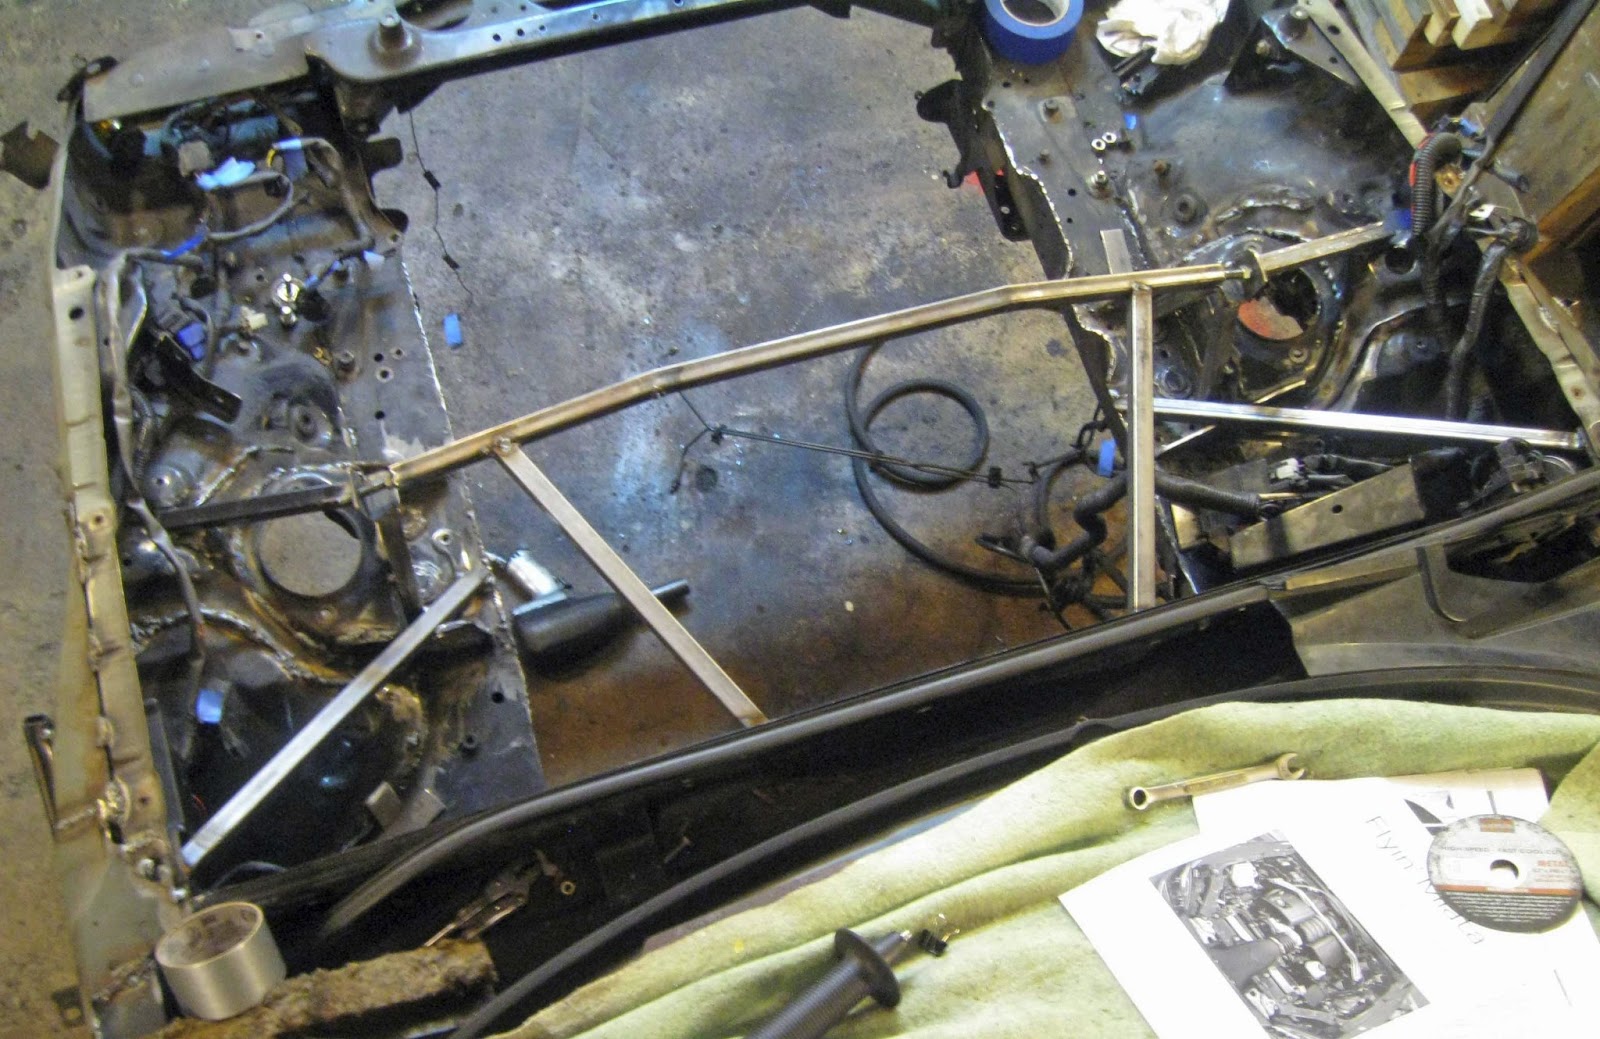
messed up on the tunnel though.
 The side walls of the tunnel should not be pushed back at the bottom like they are.  The gas pedal hit the tunnel and would not work like this.  The bottom of the tunnel should be about the same width as the top so I was way off. I didn’t take any photos but I did beat the lower part back in nearly 2 inches on each side.  For you folks trying this at home don’t make the same mistake.  Follow the measurements in the instructions closely because it is really a pain to beat it back out.

Happy Jim!

OK so it’s Sunday night at supper time and I went to unhook the gas tank from the welder.  Both gauges said 0 but there was a hiss when I took the tank loose.  I turned the valve on the tank and again hisssss.  OK so I hooked it back up and cranked the regulator and up the needle went to 20 psi.  The tank still showed 0 psi, humm.

With the price of gas I figured I would weld out what little must be in the tank.  So I fired it up and started on the floor frame rail.  At the end I looked at the tank gauge and it showed 0 but the regulator was at 25 psi.  Hummm.   OK I backed the regulator down to 15 and welded the other frame rail.  I looked at again and the tank gauge and it showed 0 but the regulator was at 20.  I had now welded 6 feet of frame with no gas in the tank but the regulator kept going up!  I looked around, scratched my head and said "Excuse me Lord, what cha doing?"  Supper was now out of the question!   So I kept on going. 
Remember the frame rails I added last winter? Click HERE if you don't.
Well after burning so many holes in things it dawned on me that I could weld these to the floor from the top really easy.  
The factory frame rails have a flange that is spot welded to the floor and that flange is between the frame I added and the floor.  This is a cross view of how it is made.

I took my grinder and cut a slot through the floor then welded all 3 layers together.  

Well even though I was totally jazzed by welding for 3 hours with no gas by 8:30 I had to call it a day.  Near as I could tell I have had plenty of gas even though the tank gage says 0...

As Elijah came to the entrance of the village he met a widow, gathering firewood. He asked her, “Please, would you bring me something to eat?”

She said, “I swear, as surely as God lives I don’t have so much as a biscuit. I have a handful of flour and a little oil; you found me scratching together just enough firewood to make a last meal for my son and me. After we eat it, we’ll die.”

Elijah said to her, “Don’t worry about a thing. Go ahead and do what you’ve said. But first make a small biscuit for me and bring it back here. Then go ahead and make a meal from what’s left for you and your son. This is the word of God:‘The flour will not run out and the oil will not become empty before God sends rain on the land and ends this drought.’”

And she went and did it did just as Elijah asked. And it turned out as he said—daily food for her and her family. The flour didn’t run out and the bottle of oil didn’t become empty: God’s promise fulfilled to the letter, exactly as Elijah had delivered it.
1 Kings 17


Interesting it was raining last night as I was welding with no gas. I wonder if I'll have any gas to weld with tonight...:-)

Friday, April 5, 2013

Clipping along at 100 feet of welding wire per hour.

Here are some more welding shots for ya.  This is the front driver’s side strut tower fairly well cleaned up.
 Notice the sparse factory welds at the arrows.
These are the times I wish clicking on the photo did not make them bigger for you!!   Well anyway this is after welding....
Yes my welds still stink but it is really hard to get all the seam sealer out so the welds bubble like crazy. I think I had my wire feed a bit too high too. Well that is the excuse I am going with anyway!

This is the underside of the same shock tower all welded (or is that buggered?) up. 

This is the same fender area seen from above. I did not weld that upper brace solid because of the large gap between the pieces and there were no welds in there at all from the factory. Crumple zone maybe?
Oh and yes that blanket caught fire several times...J

I still have the entire passenger side to do and some under the car yet but should finish up on Saturday Lord willing.
It is not hard work but certianally it is A LOT of work.   I would say I have about 7 hours in it so far and easily another 3 to go before I am done.  So far I have used 2000 feet of welding wire and will easily top 3000 feet before I am done.  The good news is wire is cheap and it's only about 3 1/2lbs of weight!

In other news the Motive gears came Thursday and I got them in.  They set up much better but I am still not happy at all with the pattern.  The problem is the opposite of the Ford gears and even with no shim in the pinion I am still too deep in the gear. 

 
The drive side is a little low but what's worse is how the pattern cuts off sharply down deep in the tooth.  The pinion too deep but I can't take any more shims out or reduce the back lash any more.  If this was a GM 7.5 like I am used to working with I think this would be noisy but on the larger Ford 8.8 I'm not so sure.  I know the bigger gears are more forgiving but you know I've had a bad experience with this.  Actually several bad experiences!

Well, I'll be poindering this situation as I weld over the weekend but no worries, "I rejoice in the Lord always. I will say it again: Rejoice!"  (Philippians 4:4)