For a quick overview video of the process start to finish CLICK ME.

For the detailed story starting at the beginning CLICK ME.

You can click on any photo in the blog to make it bigger.

Wednesday, July 31, 2013

Debugging the little bugger

I’m starting to feel like Ender battling the buggers in the classic novel Enders Game!  The good news is the bugs list is getting shorter. 
 
I finally got the brakes bled by bleeding them backwards.  I took off a rear brake hose and stuck it in a jug of brake fluid then put the vaccume pump at the line on the master cylinder to beed them from the bottom up rather than the top down.  It worked!  It sure feels good to have a firm pedal again! 

I tried everything to get my lovely purple brake proportioning valve to stop leaking at the housing seal and finally replaced it with a boring silver one.  Sad day because it’s only a year old and worked fine in the Camaro.  Another $50 over budget too!
 

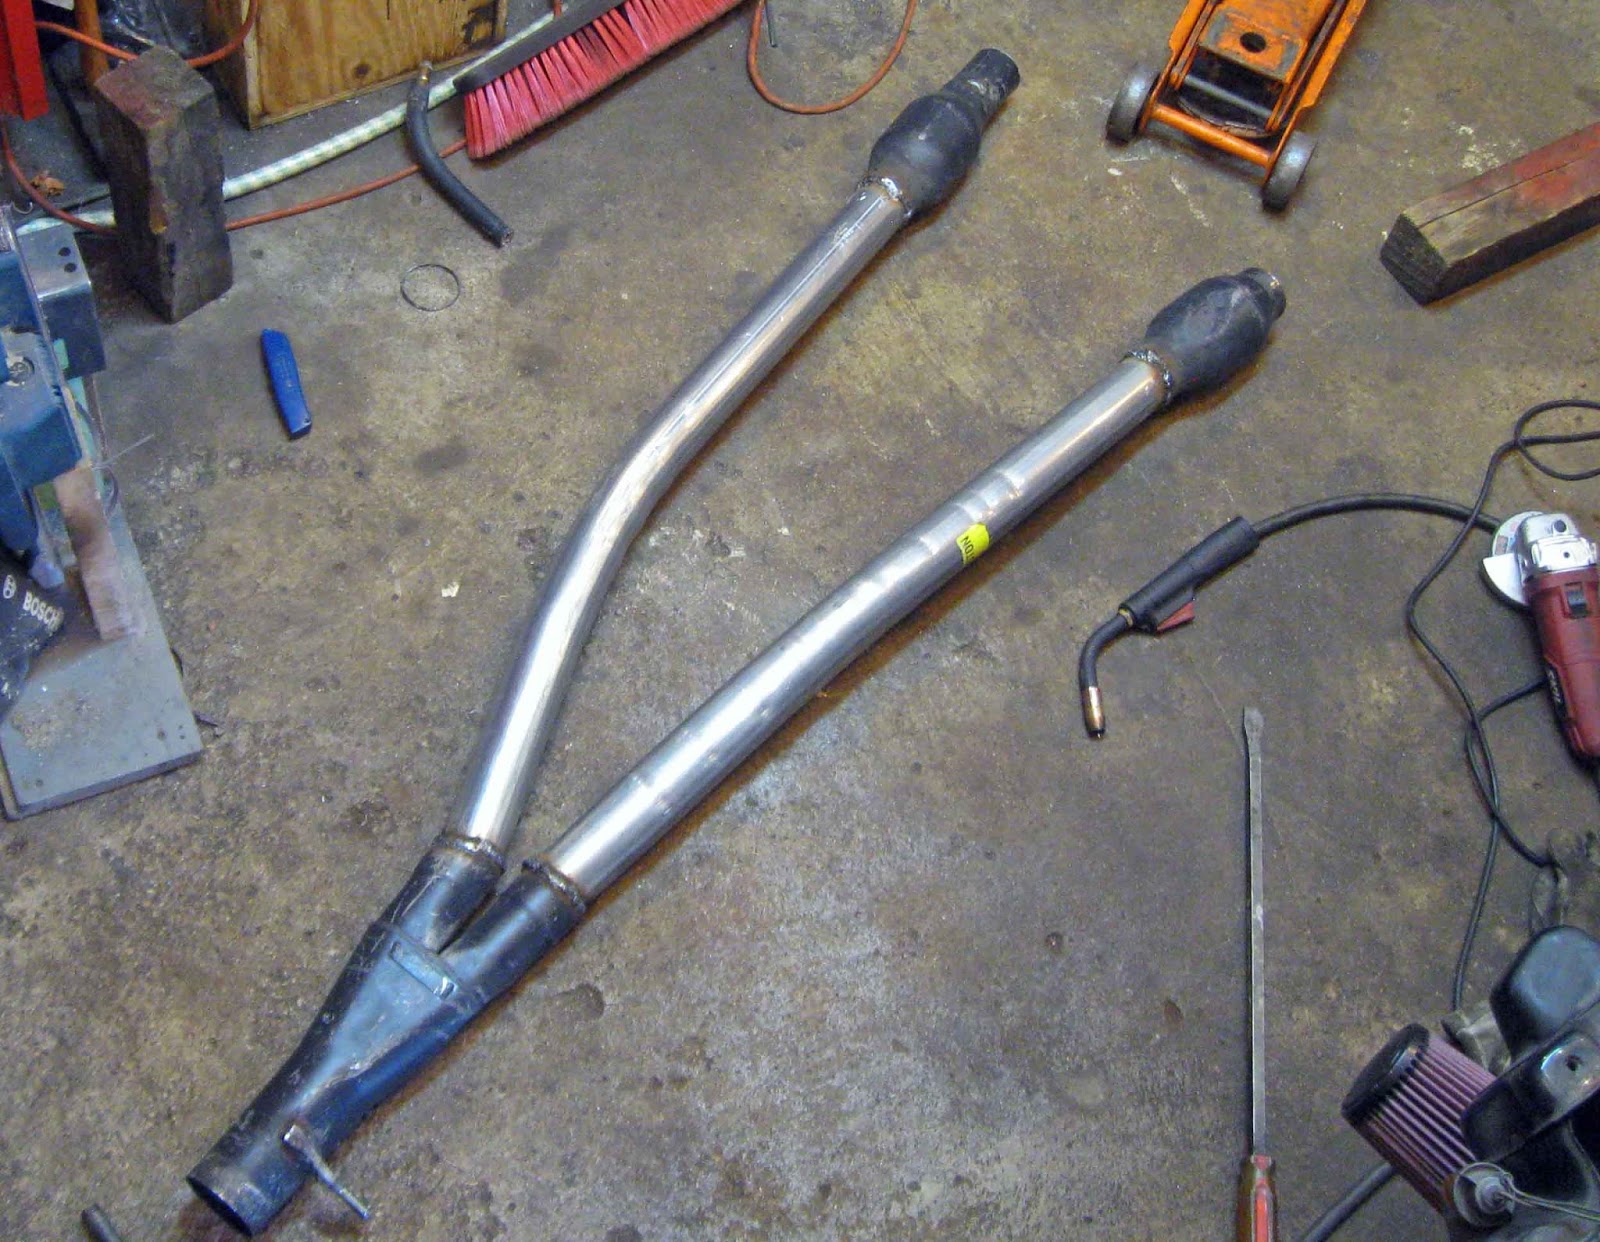
I pulled the exhaust system out to rework it for more ground clearance.  I had to wait till Saturday for parts and since it was a payday Friday I decided to drive it to work.  So I shoved the catalytic converters on the headers and had an extremely noisy commute!  She got me there in fine style don't you think?
 
After my fix of feeling like a highschool kid was done I pulled the transmission mount and reworked it to be 7/16” higher in the middle of the car than it was. I left the corner braces hang down because they are so close to the wheels they will not be a problem.

I moved the Catalytic converters from the center of the car to the headers and gained about 3/4" of clearance in the middle of the car from that. They do hang down off the headers but since it is near the front wheels it should not be a problem hitting things. Finally I put in new pipes that are bent to tuck up higher in the car and I made them slightly oval shaped at the trans mount to gain another 3/8” or so in the center.
 
 
Before:
After:
The pipes are almost flush with the frame now.  

 
After adjusting the coil overs up 1 turn in the front and 3 in the back I have a total additional clearance about 1 3/4" right in the center of the car where it is needed the most.
 
More before and after shots:


It has about the same amount of clearence as the Camaro did and I can live with that but I think it will be better due to the shorter wheel base. 

I put the hood and bumper cover back on and remembered thinking as I took it apart and the rusted bolts broke off, "I have a long way to go here so I'll worry about these bolts later".  Well as later came I figured my bumper cover is such a mess it needs to be replaced so I’ll deal with the broken bolts when I find one...:-)

I still have not washed it yet...  What do you think turn signals in or not?

For you kids trying this at home the Flyin Miata hood supports work pretty good.  See in the above photo they do tend to push the hood up in the back when it is closed due to the pressure they put on it.  I have a set of Areo latches going on this weekend that will help that.


I have my door bars in and roll bar bolted down now. 

 
By the way in case you are wondering if seam welding and all the braces I put in are worth it check out this shot.  See the gap between the front wheel and the ramp?  With the front wheels up on the ramps I jacked up the right rear and the chassis is so solid the right front went up with it!  

 And that was before the door bars and roll bar was in!
 
I still some bugs to work out and no doubt when I start pushing the car will find more.  (Grandma if you are reading this skip to the end now cuz the rest is really boring)  I do have a slight driveline vibration between 93 and 100 but it's smooth after that so I'm not sure if I am going to mess with the diff angle or not.  I know I threw it off when I raised the trans mount 7/16" but I didn't measure it before or after the change to know if I am in spec or not.  I figured I'd just wing it and see if it is smooth or not! 
 
Well I hope this post finds you happy, healthy and living in the joy of the Lord! 
____________________________________________________

Hood strut update!  I talked to Keith at Flyin Miata and he said if you turn the struts around they don't push the hood up when it is closed. 

He was right it is much better. Now if they would just change their instructions!!

Thursday, July 25, 2013

LS1 Miata 1st Road Test!

I thought the most exciting part of the build would be the first drive, but due to fear of explosions and lack of brakes it turned out calling the insurance company to put it the policy generated more excitement.
Not that she's a snooze to dive though!  My first impressions are l have never felt a convertible chassis this stable, it's more solid than the T top Camaro was for sure.  The spec Miata suspension is certainly track orientated and not for the faint of heart or date cars.  It is very firm!  And it didn't take long for me to believe the claims guys make of these cars doing 0 to 60 in under 4 seconds.  Let me give you a word picture:

Imagine the engine is a runaway stallion at full gallop rocketing across an open field.  Now picture a little gal (Jenna) with her arms wrapped tightly around his neck hanging on for dear life.  She can't control him and even though she is terrified she can't let go. 
That is what it feels like to drive the car!  She bucks and snorts and longs to bust out of the gate in a dead run. And keep in mind with the new gears in the trans and diff I am totally babying her! I truly don't know if it will be thrilling or terrifying to open it up... probably both!
I do have a number of issues to work out not the least of which is no brakes.  The way the lines run it's really hard to get the air out of them and I have a couple of stubborn leaks I'm struggeling to seal up.  It did not stop me from driving her though!
Another big issue is very low ground clearence. 

On second thought make that NO ground clearence! 
I just left the coil overs the way they were when I got them as a starting point and she is a bit on the low side especially in the back.  And yeah the poor dear needs a bath! 

I raised the rears up 2 full turns for the rest of the photos but she still has a bit of a rear squat.


The way Flyin Miata had the cats in the exhaust I knew it was going to be low when I put it in but I wanted to try it as it was before I changed it.   
I’m going to rework the exhaust to move the catalytic converters forward of the trans mount where there is more room for them to tuck up tighter.  I’m also going to modify the trans mount to move it up so the entire exhaust can move up.  This should gain me about an inch more of clearance in the center which should be good enough.


I have lots of other bugs to work out too.  Little stuff like the gas tank seal on the top of the tank is leaking, no parking lights, and the check engine light is on.  The bigger problem is for some reason both my scanners are not connecting to the computer to find out why the check engine light is on. 


So the list of things to do seems to be growing rather than shrinking!  But with it now being on the road I can work as I go and enjoy the car.  I was going to drive it to work today but we are expecting storms.  Funny how no brakes and no front end is no big deal but the possibilty of hail leaves her in the garage!

Tuesday, July 23, 2013

Getting close – SO CLOSE!

I knew there would be surprises to deal with once it was running and indeed there were several.  When I put the lines on the steering rack I did not realize the return was up against the oil pan and could not go straight in so I cross threaded it.  It leaked and I had to pull the steering rack almost completely out to fix it because there no visibility or room to get at the fittings.  It was a messy job with PS fluid dripping down on me!

I also had a leak at the oil filter adaptor.  I knew the threads on it were British pipe thread but thought I could get national pipe thread to seal up anyway.  The thread pitch is just slightly different but enough that I could not get it to seal even with permitex in it.  So for now I plugged the gauge lines and have a fitting on the way from the UK.  The adventures of buying an oil pan and remote filter off ebay!
 BTW that filter housing gets really hot when it’s running!

The radiator cap is about 3 inches lower then the heater hoses so the only way to get the air out of the system was to cut one.  No big deal and I found out both my fans work with the primary coming on about 205 and the other about 210.
I used an old piece of brake line to plumb up the coolant overflow tank and got it mounted.  The computer is about where the washer tank goes so I'll either find a small one or put it in the trunk.
I have the air cleaner installed too.  I do admire guys who make clean and tidy engine bays but as long as it works and is reliable I can live with a cluttered engine bay. 
I'm a little concerned about blocking air flow but it's not covering any of the fins on the radiator so we'll see how it goes.  Blue was on sale so...:-) 
 I did check for clearance with the bumper and I need to move it up and turn it slightly to tuck it in it there right.  But I want to road test and debug before I put the bumper and hood back on.
I also got the dash mostly buttoned up.  I decided to only use 1 of the 2 shift lights I had in the Camaro because I only use the light to know when not to shift.  If it comes on close to a braking zone it’s faster to hang on for a few seconds rather than shift up then right back down again.  The other thing is if I hit the rev limiter in a corner it would unsettle the car so I want to know when I get close.  So the light is at 6300, the rev limiter at 6500 and red line is 6700.   
The tach and gas gauge work and we'll see on the speedo.

I'm pretty much down to just a ruff alignment to road test it.  I have no doubt that will turn up new issues but it will be good to get it back on the ground and put a few miles on it.

I've been chewing on this psalm 15:8 this week.  Check it out:

I know the LORD is always with me. I will not be shaken for he is right beside me.
No wonder my heart is glad and I rejoice!  My body rests in safety.
For you will not leave my soul among the dead or allow your holy one to rot in the grave. 
You will show me the way of life granting me the joy of your presence and the pleasures of living with you forever.

If you hang on to that how can you possibly have a bad day?  EVER!

Saturday, July 20, 2013

LS1 first start - the post we have all be waiting for!!

Sorry my video camera died at the track last year so all I have is a point and shoot to do this.

Turn your volume up and
CLICK ME!
.

Thursday, July 18, 2013

The Big Gap

I finally got the computer back but my dad un-expectantly passed away the day I got it so I have not done much on the car. 

It's really weird because while I do feel a loss I don't feel very much sorrow like I thought I would.  I think it's because my dad was so close to the Lord I doubt he noticed much of a change when he died.  I guess it's hard to feel too bad when it was probably the best day of his life!  

This is my dad, my brother in the wheel chair and me. 

Dad was an outstanding craftsman, builder and problem solver and I know I owe whatever talent I have building this car to him.  He followed this blog and while he thought I was a bit nuts he was very proud of the build.  I sure do miss him!  

Well, I have a few things to get done but will probably get back to the car this weekend. I just wanted you to know why I have not posted in a while. 

Wednesday, July 10, 2013

A note to you!

Hi!  I just have to tell you who read this blog that I continue to be so amazed and humbled by your interest in it. I just stopped by and am completely blown away to see 7 people on line reading it!
 

I feel so honored that you read this and am delighted that you find value in it. 

I started it mostly to keep my family and friends informed of the progress but it has grown to around 100 hits a day and tons of followers.  I always wonder who you are and why you read this and I find it fascinating that folks in Russia regularly tune in.  

I know a few of you because we have talked here or on other forums but I would love to hear from more.  If you are a regular reader would you drop me a line and say hi?  I’d love to hear your story and why you are interested in this build.

THANK YOU!!

Tuesday, July 9, 2013

The 3rd half of the back half, 8.8 Ford axles in a Miata.

Yes this is the 3rd post on rear end work but it should be the last!  I’m getting close to being done with the chassis support plan Charlie and I started at Christmas.
 
I added side to side support to the lower control arms creating a box with the welded braces I put in when I had the subframe out.

Then from the tabs at the end of the frame rails I connected the rear subframe with a welded in brace.

Click on the photo for a bigger view.
 
Looking at it from the side you can see how it makes a box out of the existing structure to really support the rear suspension.
 

With the welding done I finished up the mechanical stuff. 
 
First in was the new rear wheel bearings with my trusty bearing press.
 

Then it was on to rebuilding the T bird axles to fit the Miata.

For those of you trying this at home I recommend the Audi boot on the right for the outside as they are nice and short to clear the shock. The normal Tbird boot is on the left.

You can see the box it came in here with the name and part #

And the clearance it gives you.
 
 
 This is a stock Thunderbird axle next to one modified for the Miata.
 
 
 The new longer studs, seals and monster shim is in and ready to roll.

 
 No I didn’t clean up the rotors because driving will do that and they will be replaced with larger ones next year anyway.
 
I blead the brakes and filled the diff so now if I could just get my computer back from the tuner!!

After 4 months of being on jack stands she is back on her feet!


In other news I am sad to report my racing seat from the Camaro won’t fit in the car.


Well it won’t fit yet anyway!  The good news it’s made out of fiberglass so it can be eaisly adjusted and there is plenty of room in the tunnel to induce a tolerance with my favorite bearing press...:-)

 
Now just between you and me I have to tell you something.  I have not looked at our club site for months but this morning I got a message from a friend in the car club I race with.  When I went to the site to retrieve it I noticed this weekend is a race weekend.  Yep you guessed it,... it took about 5 seconds to calculate I had 104 hours until the drivers meeting on Saturday to get Jenna track worthy.  But I'm not telling her that!….